Understanding Manual to Automatic Conversion
Converting a manual car to automatic is an extensive, challenging project, far beyond a simple gearbox swap. It requires significant changes to mechanics, hydraulics, and complex electronic systems, varying greatly by vehicle.
Complexity and Scope of the Project
Converting a manual transmission vehicle to an automatic system represents a technically possible yet profoundly extensive and challenging modification. This undertaking extends far beyond merely swapping gearboxes, demanding significant alterations to the vehicle’s mechanical, hydraulic, and intricate electronic systems. It is crucial to recognize that this is not a simple, straightforward swap but a project requiring substantial time, effort, and resources. The comprehensive scope encompasses the careful removal of the existing manual gearbox, the meticulous installation of the new automatic transmission unit, and the thorough integration of all necessary supporting components. These components include, but are not limited to, new pedal assemblies, wiring harnesses, and potential ECU reflashing or replacement. The overall complexity and the specific modifications required can vary significantly, depending heavily on the particular vehicle’s make, model, and year of manufacture. A detailed understanding of these inherent complexities and the full scope of work is paramount before embarking on such a significant and demanding conversion project.
Vehicle Compatibility and Feasibility
Assessing vehicle compatibility and overall feasibility is a critical first step for a manual to automatic transmission conversion. Pre-2000 vehicles, typically having fewer complex electronics, are considerably more conversion-friendly than modern cars equipped with intricate CAN-bus systems and integrated traction or stability controls. In many contemporary vehicles, features like cruise control, hill-start assist, or traction control may cease to function, or only operate after extensive rewiring and sensor integration. The project’s feasibility also heavily depends on the Engine Control Unit (ECU); ideally, it can be reflashed to an automatic map. If not, an ECU swap might be required. This level of electronic modification can significantly impact the project’s viability and cost, making thorough research into your specific vehicle’s electronic architecture and potential compatibility issues absolutely essential.

Financial and Planning Aspects
This conversion requires a high financial investment. Parts, including transmission and control modules, can cost up to $10,000, varying greatly. Thorough planning and research are essential.
Estimating Conversion Costs
The financial investment required for a complete manual-to-automatic transmission conversion project is undeniably high and significant. The cost of parts alone constitutes a major portion, encompassing the new automatic transmission itself, a perfectly matching torque converter, and vital electronic control modules. Essential wiring harnesses for electronic integration and a complete automatic pedal assembly are also significant expenses. Depending on the vehicle, a new driveshaft, flexplate, starter, and bell housing might also be necessary. These components collectively drive the cost up, potentially reaching or exceeding ten thousand dollars. This figure is highly variable, contingent upon the specific vehicle model and whether new or used components are chosen. Opting for used parts might reduce the initial outlay but could introduce unforeseen risks or future maintenance. Therefore, a meticulous and detailed estimation of all potential expenditures is absolutely crucial before commencing any conversion work.
Importance of Thorough Research
Thorough research is absolutely essential when undertaking a manual to automatic transmission conversion. It’s crucial to determine the feasibility and specific requirements for your particular vehicle make and model. Pre-2000 vehicles, for instance, with simpler electronics, are often far more conversion-friendly than modern cars equipped with complex CAN-bus systems, integrated traction, and stability controls. Research helps in selecting the right conversion kit from the many types available, ensuring it’s compatible and suitable for your vehicle. Understanding potential challenges like ECU reflashing or swapping, and how features like cruise control or hill-start assist might be affected, is vital. This deep dive into compatibility, available parts, and electronic integration prevents unforeseen complications and ensures a smoother, more successful conversion process. Without diligent investigation, the project risks becoming overwhelmingly complex and costly, making careful planning and exhaustive research indispensable.
Essential Components for Conversion

Essential components include the automatic transmission unit, torque converter, driveshaft, wiring harness, flexplate, starter, bell housing, and automatic pedal assembly. An auxiliary transmission cooler is also often necessary.
Selecting the Right Conversion Kit
Selecting the correct conversion kit is a critical initial step for a successful manual to automatic transmission swap. These kits are widely available, catering to various vehicle makes and models, and are fundamental to the entire process. It’s imperative to conduct thorough research to identify the kit that perfectly matches your specific vehicle’s requirements and specifications. Many different types of kits exist on the market, so choosing the one right for your vehicle is paramount. A typical conversion kit includes essential components like the automatic transmission unit, a suitable torque converter, the necessary driveshaft, and the crucial wiring harness. Some kits might also integrate other vital parts. Choosing the right kit ensures all major components are compatible and simplifies the installation. Always verify the kit’s contents and ensure it aligns with your conversion goals, potentially seeking expert advice. Following the kit’s instructions carefully is paramount for proper integration and safe operation, preventing future complications.
Automatic Transmission and Torque Converter
The automatic transmission unit and its corresponding torque converter are the core components for converting from manual. These essential parts entirely replace the manual gearbox and clutch system, fundamentally transforming the vehicle’s driving characteristics. Choosing the correct automatic transmission is paramount, as it must be fully compatible with the vehicle’s engine and its existing drivetrain architecture. The torque converter serves as a critical fluid coupling, efficiently transmitting power from the engine to the transmission, effectively replacing the manual flywheel and clutch assembly. It is vital to ensure that the selected transmission and torque converter are meticulously designed to operate together seamlessly, guaranteeing optimal performance and long-term reliability. The financial outlay for these primary components, particularly if new, represents a significant portion of the overall conversion cost. Careful assessment of vehicle specifics, including engine power and intended use, is crucial for guiding this vital selection, ensuring the automatic transmission and torque converter meet all operational demands for a successful conversion.
Required Driveshaft and Wiring Harness
The conversion from a manual to an automatic transmission necessitates specific modifications beyond just the gearbox itself. A new driveshaft is often a critical requirement. Manual and automatic transmissions typically have different output shaft lengths and flange designs, meaning the existing driveshaft from the manual setup will likely be incompatible with the newly installed automatic transmission. Therefore, a custom or model-specific driveshaft designed to correctly connect the automatic transmission to the differential is essential for proper power transfer and vehicle operation.
Equally important is a suitable wiring harness. Automatic transmissions are electronically controlled, requiring complex electrical connections for sensors, solenoids, and the transmission control module (TCM). The manual vehicle’s wiring harness will lack these specific connections. A dedicated wiring harness, often included in conversion kits, is vital for integrating the automatic transmission with the vehicle’s electrical system and, crucially, with the Engine Control Unit (ECU) for proper communication and functionality. Without the correct wiring, the automatic transmission cannot operate.
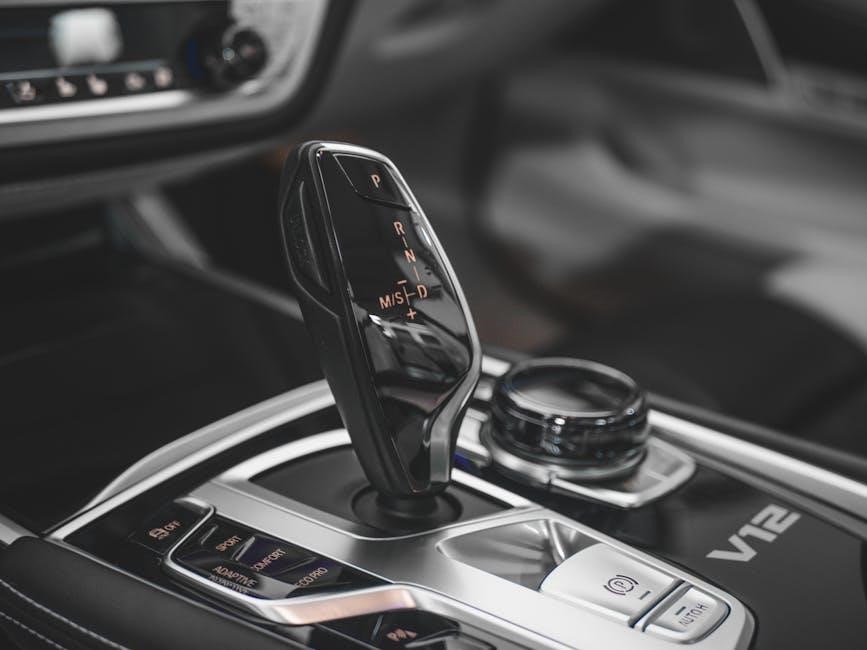
Automatic Pedal Assembly and Shifter System
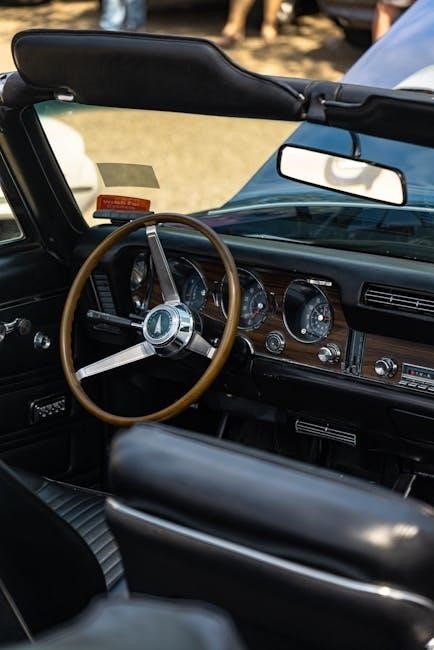
The conversion from manual to automatic transmission necessitates a complete overhaul of the pedal assembly and shifter system. In a manual vehicle, a clutch pedal is present alongside the brake and accelerator. For an automatic setup, the clutch pedal must be removed entirely. Furthermore, the brake pedal assembly typically requires replacement with an automatic version, which is generally wider to accommodate two-foot braking and often integrates with the steering column/pedal mount. This ensures ergonomic and safe operation with the new transmission type.
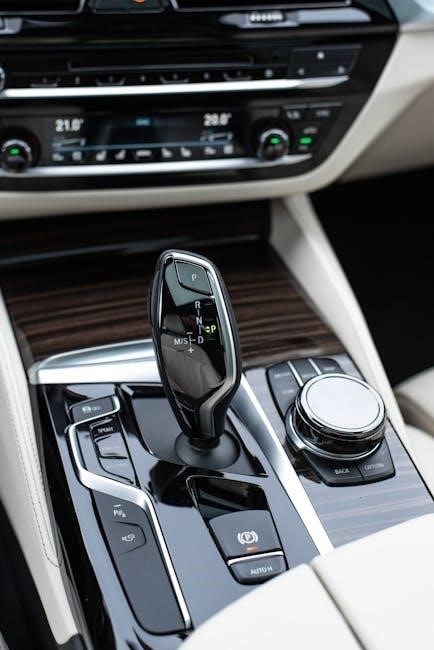
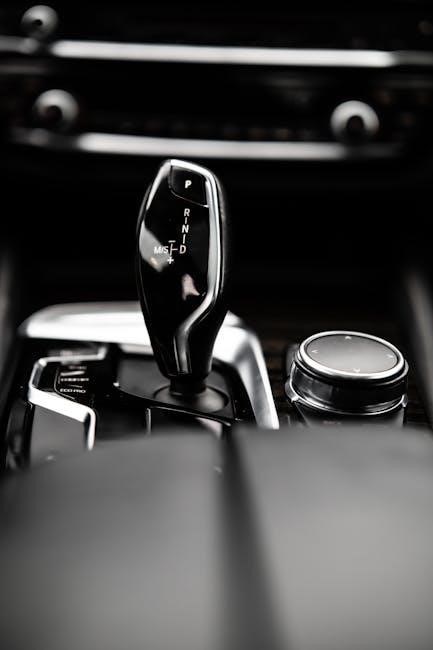
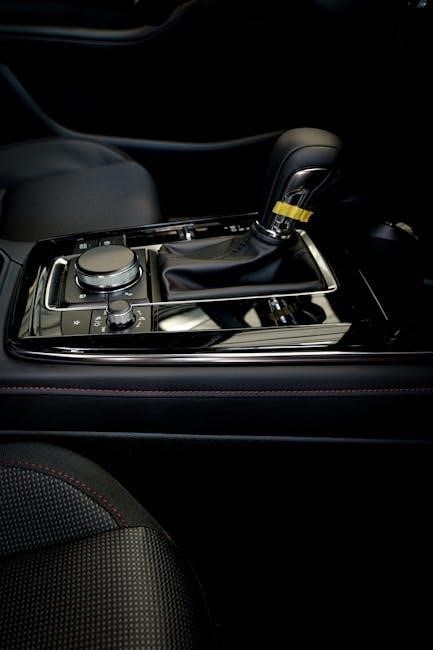
Simultaneously, the manual gear stick and its associated linkage must be replaced with an automatic shifter system. Manual shifters typically show 5-6 gear levels, reverse, and neutral. An automatic shifter, conversely, features positions like Park, Reverse, Neutral, Drive, and possibly lower gears (L1, L2). This involves installing a new shifter mechanism, often in the center console, along with its corresponding shift cable or electronic linkage connected directly to the automatic transmission. This ensures proper gear selection and engagement for the automatic operation.
Flexplate, Starter, and Bell Housing
The conversion from a manual to an automatic transmission necessitates specific components like the flexplate, starter, and bell housing for proper engine-to-transmission coupling. The manual vehicle’s flywheel, designed for clutch engagement, must be replaced with a flexplate. This flexplate connects directly to the automatic transmission’s torque converter, facilitating power transfer without a clutch. It is crucial to use the correct flexplate specifically designed for your engine and the new automatic transmission to ensure compatibility.
Furthermore, the starter motor often differs between manual and automatic vehicles. The automatic transmission’s bell housing, which encases the torque converter and connects the transmission to the engine, typically has a different bolt pattern or depth. Consequently, the starter motor’s mounting position and gear engagement with the flexplate can vary. Therefore, a starter motor compatible with the automatic transmission setup is essential. The bell housing itself is a critical interface, requiring the correct type to perfectly mate the engine block with the new automatic gearbox, often involving the transfer of dowel pins for precise alignment.
Necessity of an Auxiliary Transmission Cooler
An auxiliary transmission cooler is often a crucial addition when converting a vehicle from a manual to an automatic transmission. Automatic transmissions inherently generate significantly more heat during operation compared to their manual counterparts. This increased thermal output is primarily due to the continuous fluid coupling within the torque converter and the hydraulic operation of the gear sets. Elevated transmission fluid temperatures can severely degrade the fluid’s lubricating properties, leading to accelerated wear on internal components and ultimately, premature transmission failure. To mitigate this critical risk and ensure the longevity and reliability of the newly installed automatic gearbox, adding a dedicated auxiliary transmission cooler is highly recommended. This separate cooling unit helps maintain optimal fluid temperatures, preventing overheating and preserving the integrity of the transmission, especially under demanding driving conditions. Without it, the lifespan of the automatic transmission could be drastically reduced.

Vehicle Preparation Steps
Prepare the vehicle by jacking it up and securing it on jackstands with the e-brake engaged. Remove front tires, under-engine plastic, then drain the coolant and transmission fluid safely.
Securing the Vehicle and Wheel Removal
Before proceeding with any significant work on the vehicle’s transmission, proper preparation and securing of the car are absolutely essential for safety. Begin by carefully jacking up your vehicle and then immediately place it securely on jackstands, ensuring maximum stability. It is paramount to make sure your e-brake is fully engaged to prevent any unintended movement during the conversion process. Next, prepare the axle nuts for removal; you must first hammer out the notch on the axle nut itself, using a small flathead screwdriver and a hammer to round out the nut. Subsequently, break loose the axle nuts. This step often requires considerable force; sometimes, two people pushing together are needed to free them. Crucially, do not remove them completely yet. Finally, remove the lug nuts on both front tires, detach the tires, and set them aside.
Draining Fluids: Coolant and Transmission Fluid
After the vehicle is securely elevated and the wheels are removed, the next critical step involves draining the necessary fluids to prevent spills and facilitate the transmission removal process. It is important to drain both the engine coolant and the existing transmission fluid thoroughly. To drain the coolant, locate the drain cock, typically found at the bottom of the radiator, and carefully open it, allowing the coolant to flow into a suitable collection pan. For the transmission fluid, you will need to access the transmission itself. Locate the drain nut on the transmission, which is often a 3/8 ratchet nut, and loosen it to allow the automatic transmission fluid to drain completely. Ensure you have large enough containers to collect all the fluids, disposing of them responsibly according to local regulations. This meticulous draining prevents mess and ensures a cleaner workspace for subsequent steps in the conversion.
Axle Nut Preparation and Loosening
After the vehicle is safely secured on jack stands and the front wheels are removed, the next crucial step involves preparing and loosening the axle nuts. Begin by identifying the notch on the axle nut itself. This notch secures the nut in place and must be flattened before loosening. Using a small flathead screwdriver and a hammer, carefully hammer out this notch to round out the nut, allowing it to turn freely. Once the notch is no longer engaging, proceed to break loose the axle nuts. This step often requires a significant amount of force; some nuts may even necessitate two people pushing simultaneously to achieve the initial break. It is paramount to apply steady, strong force. However, at this stage, it is extremely important to loosen them sufficiently but do not remove the axle nuts completely. They will be fully removed later in the process.
Removing Under-Engine Components
With the vehicle securely elevated on jack stands, and after completing the preliminary steps of wheel removal and axle nut preparation, the next critical phase involves gaining unobstructed access to the underside of the engine and transmission. This requires removing all under-engine plastic components. These typically include splash shields, aerodynamic covers, and various protective panels designed to guard against road debris and improve airflow. The exact method for removal will vary significantly depending on the make and model of your vehicle, as fasteners can range from clips and push-pins to bolts and screws. Carefully inspect the perimeter of each plastic component to identify all attachment points. It is essential to remove these covers methodically and safely to prevent damage, as they often conceal critical components and provide necessary clearance for the subsequent steps of transmission fluid drainage and component removal. Keep track of all fasteners for organized reinstallation.

Installation and System Integration
Installing the automatic transmission is a complex process requiring precision and care. It involves integrating all necessary components to support the new system, ensuring proper function.
Automatic Transmission Installation
The installation of the automatic transmission is a complex process requiring precision and significant care. This critical step involves carefully positioning the new automatic gearbox into the vehicle’s chassis after the manual transmission has been completely removed. It’s essential to ensure proper alignment with the engine’s bell housing and to securely mount the unit to the vehicle’s frame. Integrating the new transmission also means connecting it to the appropriate driveshaft, which may require modification or even full replacement. Torque converter installation must be done meticulously, ensuring it is fully seated before mating the transmission to the engine. Attention to detail during this phase is paramount to avoid future operational issues and ensure the entire system functions smoothly and reliably. The entire process demands a thorough understanding of automotive mechanics, often benefiting from specialized tools for correct placement and securing all crucial components.
Chassis and Pedal System Modifications
Chassis and pedal system modifications are a critical phase in converting from manual to automatic transmission. This involves the complete removal of the manual clutch pedal and often replacing the existing brake pedal with a wider, automatic-specific unit. The entire pedal assembly, typically mounted within the steering column/pedal mount, will need to be swapped or significantly reconfigured to accommodate the automatic setup. A stock automatic transmission pedal system has distinct mounting requirements. Furthermore, the vehicle’s chassis itself might necessitate adjustments for the new automatic transmission’s mounting points and bell housing, and possibly for driveshaft clearance. These structural and ergonomic alterations are vital for correct functionality and driver comfort. Such changes are part of the extensive mechanical modifications required, ensuring the seamless integration and reliable operation of the new automatic transmission. Precise execution of these modifications is paramount for safety and optimal vehicle usability.
Electrical System and Sensor Changes
Converting a vehicle from manual to automatic transmission necessitates significant electrical system and sensor changes. Modern CAN-bus-based cars with integrated traction and stability systems pose greater challenges, often requiring extensive rewiring and meticulous sensor integration. Older, pre-2000 vehicles with minimal electronics are generally more conversion-friendly. A key aspect is the Engine Control Unit (ECU); it may require reflashing to an automatic map, or in some cases, a complete ECU swap might be necessary to properly manage the new transmission. Features such as cruise control, hill-start assist, and traction control might cease functioning without proper electrical integration. The automatic transmission computer must be correctly incorporated, or managed, unless switching to a manual ABS pump. Depending on the vehicle, a standalone computer might be used for a computer-controlled automatic transmission, ensuring all electrical components and sensors communicate effectively for optimal operation.
Engine Control Unit (ECU) Integration
Proper Engine Control Unit (ECU) integration is paramount when converting from a manual to an automatic transmission. The ECU manages engine performance and, crucially, interacts with the transmission for seamless operation. If possible, the existing ECU should be reflashed with an automatic transmission map to ensure compatibility and correct shifting logic. In scenarios where reflashing isn’t feasible or sufficient, swapping to an ECU specifically designed for an automatic setup becomes necessary. Modern vehicles, especially those with intricate CAN-bus systems and integrated stability controls, demand precise ECU calibration to prevent malfunctions with features like cruise control or hill-start assist. Depending on the vehicle, a standalone computer might be required to effectively manage a newly installed computer-controlled automatic transmission. It’s also important to manage the original transmission computer; it should remain plugged in unless the ABS pump is also swapped to a manual version, ensuring no conflicts arise.

Post-Conversion Checks and Operation
After conversion, essential checks ensure proper function. This involves calibrating gauges, making necessary adjustments, and conducting thorough final testing to confirm safe and optimal operation.
Gauge Calibration and Adjustments
After installing the automatic transmission, a crucial step involves calibrating the vehicle’s gauges and making necessary adjustments to ensure accurate readings and proper system integration. The conversion process often necessitates changes to the electrical system and potentially the Engine Control Unit (ECU), which directly impacts how instrument cluster gauges function. For instance, the speedometer, tachometer, and other indicator lights must correctly reflect the new automatic transmission’s operational parameters. This might involve reflashing the ECU to an automatic map, if previously set to manual, or ensuring the existing transmission computer properly communicates with the dashboard. Careful attention to wiring harnesses and sensor changes is vital to prevent erroneous readings. Additionally, any new sensors associated with the automatic transmission, such as those for fluid temperature or gear position, require correct integration and calibration to display information accurately on the dashboard. This comprehensive calibration ensures safety and reliable vehicle operation post-conversion.
Final Testing and Safety Protocols
Upon completing the manual to automatic conversion, rigorous final testing and adherence to safety protocols are paramount. This phase involves comprehensive road tests to evaluate the new automatic transmission’s shifting quality, responsiveness, and overall performance under various driving conditions. Re-check all fluid levels, especially transmission fluid and coolant, after the vehicle reaches operating temperature. Verify the new automatic pedal assembly functions correctly, particularly the brake pedal. All electrical system changes and sensor integrations must be re-inspected, ensuring no warning lights are present and all gauges provide accurate readings. For modern vehicles, confirming cruise control and traction control functionality is critical; some features may not work without extensive rewiring or specific ECU reflashing. Prioritizing safety means addressing anomalies immediately, seeking professional assistance for final diagnostics, and guaranteeing a reliable, secure driving experience.